
Organizing & Repurposing DIY
June 26, 2012
Preparing For The Holidays
October 5, 2012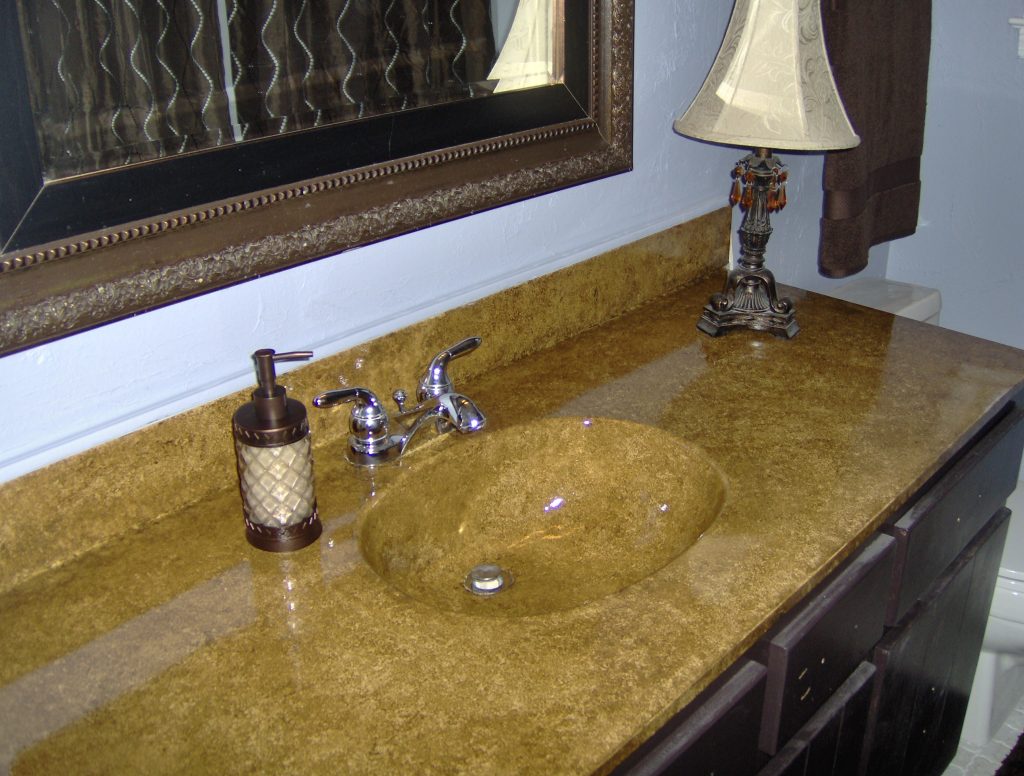
 Did you know that painting a vanity top was even possible?
It is and it’s an easy and affordable project!
Get DIY step by step
Painting A Vanity Top DIY.

I live in a 40+ yr old home and my guest bath was really showing it’s age. My husband and I had plans to do a total gut job, but never seemed to have the extra money in our budget. So, I took matters into my own hands. If I can’t replace it, I can change it!
My first project was painting the vanity top. Yes, paint! I did this in my master bathroom 5-7 years ago and it still looks great. Here is how I did it:
Keep in mind, I started on this project before I remembered to take pictures. The vanity already has one coat of white “water” based Kilz 2 on it as well as some of my gold base paint.
So this is my “almost” before picture of my ugly bathroom. I am not really sure what you call this old type of counter top, but the best way for me to describe it would be a plastic marble look?? What you see in most all old houses.
Note to self: This really should be that last thing you do in your make over. I only decided to paint the rest of the bathroom after I started this.
NO WATER…….ONCE YOU START THIS PROCESS, YOU CANNOT USE THE SINK UNTIL FINAL STEP IS COMPLETED. THERE IS TO BE NO WATER AT ALL OR IT WILL RUIN YOUR FINISH.
Step by step for painting a vanity top
Painting A Vanity Top Step 1. Lightly sand and clean surface. Let dry
Painting A Vanity Top Step 2. Tape fixtures with painters tape or remove faucet and drain. (I have done this both ways) When I did my master bath years ago, I removed the faucet and drain. This time I tried the tape. It seemed to work fine. Just make sure you apply the tape neatly and evenly. Also make sure that the drain is completely covered. You do not want paint drying in your pipes.
I also put a large sign on the facet “DO NOT USE” to prevent messing it up. This was easy because it is just my husband and I. If you have kids, you need to be creative with how you protect this until it is complete.
Painting A Vanity Top Step 3. Primer
 Apply one coat of kilz 2 “water based” primer and let dry aprx 1 hour or until not tacky. It usually dries fast.
Painting A Vanity Top Step 4. Paint a base coat of paint.
 One good coat is all you need. “Very lightly” sand smooth if needed. The paint I used was interior, semi-gloss, and the color is Bungalow Gold. I got it at Lowes. Again this is a water based paint. You can literally use any kind of paint. It is the final step to this that protects this for everyday use.
This is an important note:
Remember you can always put oil based paints over water based paints …BUT….You cannot put water based paints over oil based paints. I used all water based paints because it is what I had on hand and it dries faster. However, you can use oil based paints for your base but every coat after that must be oil based.
Painting A Vanity Top Step 5. Faux finish

This next product is what I used. I can hear you screaming now! “This won’t hold up for painting a vanity top!!!” Bare with me, it will. It is a process. This is faux translucent color glaze. The color here is Raw Unber # 68413. You can always use any paint you have available but for this next step, it may need to be watered down a little. That is why I like the glaze because it is thinner.
 Next you will need a natural painter’s sponge. I always buy a big piece and cut off a small piece to work with.


 This is where it gets creative, my favorite part. Lightly tap on glaze. The reason I like to use glaze is because it stays wet longer so you can work with it until you get the desired look. I like to apply a light coat first and let it dry for an hour or so. Then I go back and add another layer. I repeat this until I like the result. You can easily add different colors but make sure you let one color dry before applying another. Once you have the desired look, let dry until it is not tacky feeling.
Painting A Vanity Top Step 6. Polyurethane


It is important to be happy with your finish before you do this step. Once the poly goes on you cannot add more paint!
This is where an oil based product comes in. You must use an oil based polyurethane to seal and protect. It is also important to use the correct paint brush for this. This is a special brush for oil based paint with extra smooth finish. This is the part that takes time. You want to apply 5 – 7 coats. LETTING EACH COAT DRY BEFORE APPLYING ANOTHER. If needed you can lightly sand in between coats. Make sure you apply very little pressure. If you get the fast drying like I did, it only takes a couple of hours between coats. Once the final coat is dry, let it cure overnight before using water in sink. Make sure you follow instructions on can for clean-up in between coats and after you are finished. Enjoy your new vanity!
The finished project. Keep in mind that I took many of these pictures before everything was totally cleaned up. So pardon the dust. You can see I am not a photographer :).


Cleaning: Use only non abrasive cleaners. I use Lysol and Windex on mine.
So now you know that painting a vanity top is possible and FUN!
Let me know what you think! I welcome your comments and questions.
If you decide on painting a vanity top, send me some pics and I will put them on here. Email them to me at susan@simplify-organize.com
Important note: Let’s Get Organized is not like the other blogs. I am very up front about selling products on my site. I work from home helping you! I am a professional organizer with a heart to help others, by blogging about what I know. Most blogs hide what they are selling to make it look like they are not trying to sell it. That is not me and there are no secrets here.
4 Comments
I did exactly as you said ,I sanded my vanity ,3 coats of latex and put clear coat oil base 5 coats with a brush I bought just for it ,thank you so much for your help
Hi Crystal, I am not sure you could do this on actual stone. My tops were the builders grade faux marble tops that are some type of acrylic material. Good luck!!
Can you do this on cultured marble vanity tops?
Hi, beautiful outcome, wow! I wonder if I could do this to my countertops? I have been researching and researching on how to do it, and I am so nervous about it. Thank you Susan.